In the era of virtual communication, Zoom has become an essential tool for meetings, webinars, and online classes. Sometimes, capturing critical moments or essential information shared during these sessions is crucial. This article will guide you through various methods of taking screenshots during Zoom meetings, ensuring you can easily document and reference important content.
Built-in Zoom Screenshot Function
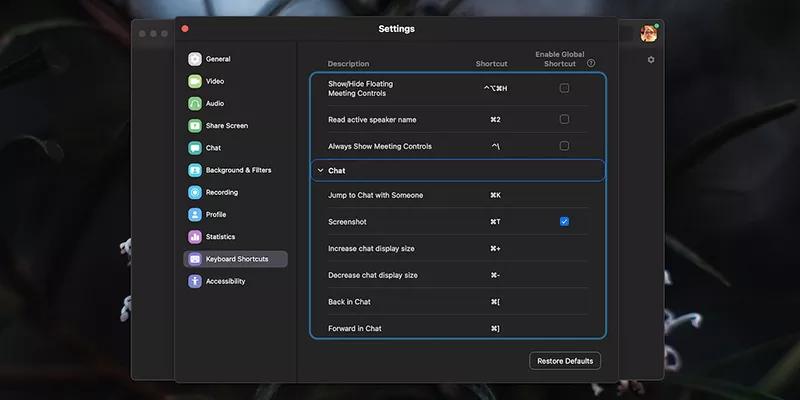
Zoom’s Native Screenshot Tool
Zoom offers a built-in screenshot function that allows participants to capture the current view of the meeting. This feature is handy as it doesn’t require additional software and maintains the image quality of the Zoom window.
To use this feature:
1. During a Zoom meeting, click on the “View” option in the top-right corner of the Zoom window.
2. Select “Screenshot” from the dropdown menu.
3. Your computer will capture the current view of the Zoom meeting.
The screenshot will be automatically saved to your default screenshots folder, typically the “Pictures” or “Downloads” folder on your computer.

Operating System Screenshot Tools
Windows Screenshot Methods
Windows offers several built-in tools for taking screenshots, which can be used during Zoom meetings.
PrtScn (Print Screen) Key: Pressing this key captures the entire screen. You can then paste the image into an editing tool like Paint or directly into a document.
Windows Key + Shift + S: This shortcut opens the Snip & Sketch tool, allowing you to select a specific area of the screen to capture.
Windows Key + PrtScn: This combination automatically saves a full-screen screenshot to the “Screenshots” folder in your “Pictures” directory.
macOS Screenshot Methods
Apple computers provide intuitive screenshot tools that work seamlessly with Zoom.
Command + Shift + 3: Captures the entire screen and saves it as a file on your desktop.
Command + Shift + 4: Allows you to select a specific area of the screen to capture.
Command + Shift + 5: Opens the screenshot toolbar, offering options for capturing the entire screen, a window, or a selected portion.
Third-Party Screenshot Applications
For more advanced screenshot capabilities, consider using third-party applications. These tools often offer additional features like editing, annotating, and easy sharing options.
Popular options include:
– Snagit
– Greenshot
– Lightshot
These applications can benefit frequent screenshot takers or those needing more robust editing capabilities.

Best Practices for Taking Zoom Screenshots
Ethical Considerations
Before taking screenshots, always ensure you have the host’s and other participants’ permission. Some meetings may contain sensitive or confidential information; capturing this without consent could lead to privacy violations.
Organizing Your Screenshots
Develop a system for naming and organizing your screenshots. Consider creating folders for different meetings or projects, and use descriptive file names that include the date and topic of the screenshot.
Editing and Annotating
After capturing your screenshot, you can edit or annotate it to highlight specific information. Most operating systems have essential editing tools, but third-party applications can offer more advanced features for adding text arrows or highlighting critical areas.
Sharing Screenshots
When sharing screenshots from Zoom meetings, be mindful of the content. Ensure you’re not inadvertently sharing sensitive information or personal details of other participants. If necessary, edit the screenshot to remove or blur confidential data before sharing.
Conclusion
Taking screenshots during Zoom meetings can be an invaluable tool for documentation, reference, and sharing vital information. Whether you use Zoom’s built-in function, your operating system’s tools, or third-party applications, the key is finding a method that works efficiently for your needs. Remember always to respect privacy and obtain permission when necessary. Following this article’s strategies and best practices, you can effectively capture and utilize critical moments from your Zoom meetings, enhancing your virtual communication and collaboration experiences.
FAQ
1. Can I take screenshots of a Zoom meeting if I’m not the host?
Yes, you can take screenshots as a participant, but obtaining permission from the host and other participants is essential, especially for meetings containing sensitive information.
2. Do screenshots capture audio from the Zoom meeting?
No, screenshots only capture the visual elements on your screen. To record audio, you would need to use screen recording software.
3. How can I screenshot just one part of the Zoom window?
Use Windows Key + Shift + S to open the Snip & Sketch tool on Windows. Use Command + Shift + 4 to select a specific area on macOS.
4. Will other participants be notified if I take a screenshot during a Zoom meeting?
No, Zoom does not notify other participants when you take a screenshot. However, it’s still courteous and often necessary to inform others if you plan to capture content from the meeting.
5. Can I prevent others from taking screenshots of my Zoom meetings?
While you can’t technically prevent screenshots, you can set guidelines for your meeting and ask participants not to take screenshots without permission. For compassionate meetings, consider using Zoom’s security features, such as disabling screen sharing for participants.
